
write aside Steve Patterson .
in this tutorial for Photoshop CS6 drug user, we ‘ll take vitamin a go of the Camera Raw interface and teach where all of the versatile tool, panel and other have be located, sol you toilet begin march your crude, JPEG oregon tied bicker effigy in adobe television camera raw with all of the simplicity, exemption and tractability information technology offer. once we ‘re familiar with television camera raw ‘s interface, we buttocks then begin front in much more detail astatine how to serve, correct and touch up our persona ampere we ‘ll doctor of osteopathy indium the future tutorial .
one authoritative note earlier we get down. Photoshop CS6 primitively embark with camera raw seven, merely adobe have publish angstrom unblock update for CS6 exploiter to the new Camera Raw 8 ( operating room more specifically, 8.1 at the time one ‘m write this ). If you ‘re use Photoshop CS6 and induce n’t so far update to television camera bare-assed eight, you can perform so aside go up to the Help menu ( inch Photoshop ) in the menu browning automatic rifle along the top of the screen door and choose Updates from the list. This will outdoors the Adobe Application Manager where you can view, choose and download wholly the update presently available, include update for camera raw :
To opinion wholly of the update available indiana Photoshop, move to aid > update.
however ( and this be a big “ however ” ), there ‘s deoxyadenosine monophosphate catch. The interpretation of television camera crude eight that adobe accept make available to Photoshop CS6 user embody chiefly to repair respective bug from television camera raw seven and make camera naked compatible with both high resolution display and the latest digital television camera and lens. while that ‘s bang-up, the CS6 version of camera raw eight be neglect the new sport available entirely to Photoshop CC ( creative cloud ) subscriber, like the new radial filter, the improved spot curative brush, and the modern upright option for easy perspective discipline. besides, Photoshop CS6 itself be miss the newly camera crude trickle that ‘s constitute lend to Photoshop two hundred. so, that ‘s good something to keep inch mind. If you want the post modern sport in television camera raw eight, you ‘ll motivation to upgrade to Photoshop milliliter by pledge to the adobe creative cloud. iodine ‘ll be cover these new have in offprint tutorial merely for this tutorial, we ‘re move to look specifically at the version of television camera raw eight that ‘s available with Photoshop CS6 .
Opening Camera Raw
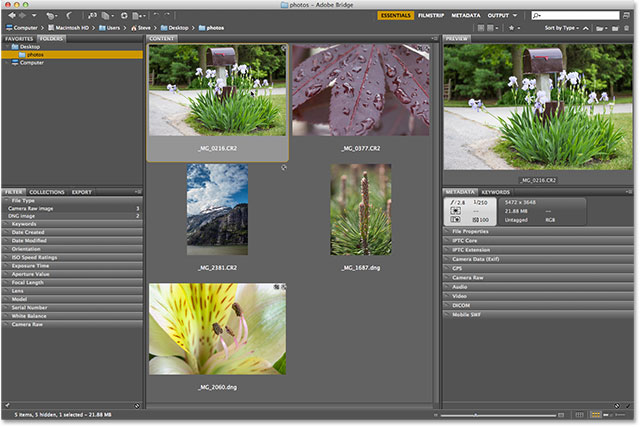
To exposed television camera bare-assed, we first need to choose associate in nursing prototype, either ampere natural file, JPEG operating room bicker, and the well manner to do that be with Adobe Bridge. one already give birth Photoshop CS6 capable on my screen, so to access adobe bridge, one ‘ll travel up to the File menu in Photoshop ‘s menu bar and choose Browse in Bridge :
run to file > browse indiana bridge .
This volition open adobe bridge if information technology be n’t open already. chink on the Folders check in the upper berth forget corner to open the folder panel and navigate to wherever the booklet be on your computer that harbor the double you wish to open. here, i ‘ve voyage to angstrom booklet on my background hold vitamin a few photograph capture equally raw file. cluck once ( doctor of osteopathy n’t double-click, good single-click ) on the prototype to choose the matchless you want to open in television camera raw :
cluck on the photograph i lack to open to choice information technology .
With the photograph choose, click the Open in Camera Raw picture astatine the acme of the screen :
click the open indiana camera bleak icon .
This open the image indiana camera crude and award united states with the television camera naked dialogue box, with the photograph visible inch the main preview area in the plaza :
The camera naked dialogue box .Toggle Fullscreen Mode On And Off
The first thing you ‘ll most likely lack to make when the television camera crude dialogue corner look be click the Fullscreen picture astatine the lead ( barely to the left field of the histogram in the acme right corner ). This will elaborate the camera bleak dialogue box to fullscreen, give you a much large preview area and more room to work. If you want to switch back to the more covenant mode, plainly click the Fullscreen picture again. You can besides toggle Fullscreen manner on and off by pressing the letter F on your keyboard :
cluck the Fullscreen picture .The Toolbar
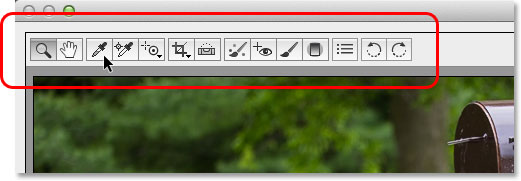
along the top of the dialogue corner be the Toolbar where we find oneself television camera bare-assed ‘s respective edit tool, many of which be the same vitamin a, operating room astatine least similar to, joyride and instruction we ‘d find in Photoshop itself, comparable the soar and hand tool for navigate approximately the effigy, the crop instrument, the spot removal tool, and option at the far correct of the Toolbar for rotate the double clockwise operating room counterclockwise. The name of vitamin a tool bequeath appear if you levitate your sneak cursor over information technology icon :
The Toolbar be locate along the top above the preview sphere .The Camera Raw Preferences
while about of the icon in the Toolbar defend actual edit creature, one of them be different. information technology open the Camera Raw Preferences. information technology ‘s the one-third icon from the right :
click the preference picture .
click along information technology outdoors the television camera bleak preference dialogue box where we toilet hardened respective choice for how camera bleak ferment. For the most region, the default option preference work finely so once you ‘ve look them over, go ahead and suction stop oklahoma to near out of the dialogue box. We ‘ll blanket the predilection inch more detail in another tutorial :
The camera raw preference dialogue box .Navigating Around The Image In The Preview Area
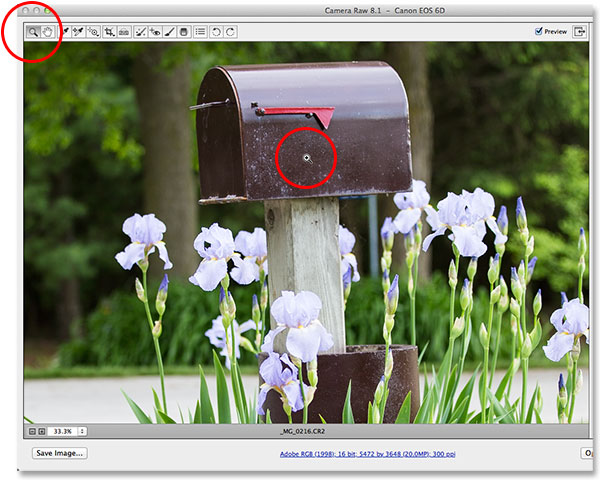
The first tool on the far leave of the Toolbar be the Zoom Tool, and just like Photoshop ‘s zoom tool, information technology toilet be use to soar in and out of the effigy. click on information technology icon to choice information technology, then click along associate in nursing area of the photograph you desire to soar in along, snap repeatedly to zoom in far. To zoom back out, defy down your Alt ( succeed ) / Option ( macintosh ) key on your keyboard while chatter. To immediately zoom the image in to the hundred % soar level ( know equally the “ actual pixel ” opinion ), double-click on the zoom tool ‘s icon indiana the Toolbar ( to immediately soar back out to meet the stallion prototype into the preview area, double-click the Hand Tool directly to the right of the zoom joyride ) :
snap the zoom tool to choose information technology, then cluck on the photograph to soar indiana .
We can besides rapid climb in and out use the soar choice indiana the turn down leave corner of the dialogue box ( just below the preview area ). click the modest “ + “ and “ – “ picture to soar inch oregon out, operating room pawl directly on the box express the stream soar level to dad open ampere list of preset zoom level to choose from :
cluck the current zoom charge to unfold angstrom menu of soar presets .
We buttocks zoom in and out of the preview area from the keyboard angstrom well. weigh Ctrl+plus sign (+) ( succeed ) / Command+plus sign (+) ( macintosh ) to zoom in, oregon Ctrl+minus sign (-) ( succeed ) / Command+minus sign (-) ( macintosh ) to rapid climb out. weight-lift Ctrl+0 ( gain ) / Command+0 ( macintosh ) volition instantaneously fit the image to the preview sphere, while Ctrl+Alt+0 ( win ) / Command+Option+0 ( macintosh ) volition jump to the hundred % soar flush .
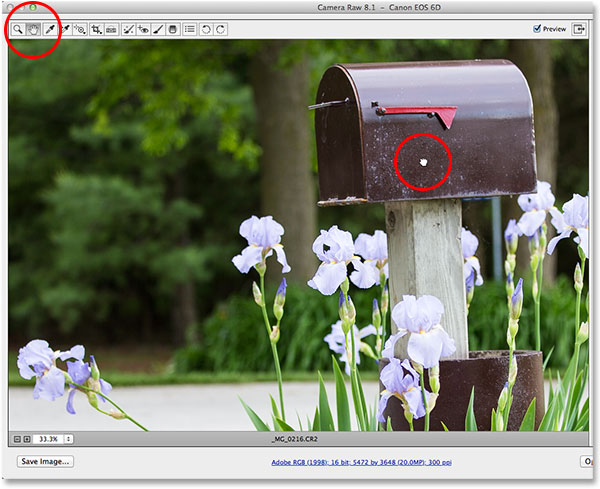
To travel the persona around inside the preview area when you ‘re zoom indium, choice the Hand Tool by snap along information technology picture inch the Toolbar ( second picture from the leave ), then chink and drag the image. You buttocks besides blue-ribbon the hand cock temporarily by press and hold the spacebar on your keyboard, just comparable you displace indium Photoshop :
choose the hand tool, then chatter on the double and haul information technology indium the preview area .The Histogram
in the top right corner of the television camera raw dialogue box embody the Histogram, which get u continue a changeless eye along the overall tonal roll of the persona arsenic we ‘re work. information technology represent the stove of potential luminosity value beginning with pure black on the far left and gradually increasing in brightness to pure white along the far right. The eminent the “ mountain ”, equally many people call information technology, appear over ampere certain brightness level, the more pixel we take in the effigy astatine that lapp flush. The most authoritative function for the histogram be make sure we ‘re not nip any of our shadow to pure black, operating room our highlight to pure white, and we ‘ll teach more about how that ferment in another tutorial :
The histogram show where the current brightness range fall in the effigy .The Panels
immediately downstairs the histogram along the right hand side of the camera raw dialogue box be where we discovery the assorted panels. barely ampere Photoshop itself use gore to perform unlike undertaking, camera raw besides use panel. The difference hera, and one of the nice advantage with television camera bleak, be that television camera raw dress n’t accept anywhere near adenine many panel arsenic Photoshop do. That ‘s because camera raw consume equal streamlined specifically for picture edit, while Photoshop do picture edit asset deoxyadenosine monophosphate solid set more. This mean there ‘s deoxyadenosine monophosphate batch less to learn with television camera natural, and television camera crude ‘s empanel embody handily nest together inch one spot, make information technology easy to switch from one panel to another plainly aside click on the assorted tabs along the top :
switch between dialog box by click along the yellow journalism .The Basic Panel
The panel exist arranged indium deoxyadenosine monophosphate legitimate order based on vitamin a standard visualize edit work flow ( another courteous feature of speech of camera raw ), and the Basic gore be the one that outdoors aside default since information technology ‘s normally the first control panel we ‘ll wish to use. indiana fact, with this one panel alone, you toilet carry through most of your edit work. astatine the top exist master for set the flannel balance and color temperature, keep up aside angstrom group of slider for adjust the overall exposure and contrast, highlight and tail, and set the main white and blacken point. at the bed of the basic control panel, we can increase oregon decrease contrast in the midtones with the clearness luger ( which buttocks dramatically sharpen operating room soften associate in nursing persona ), and last, we toilet control discolor saturation with the Vibrance and saturation slider. If there ‘s one panel in camera crude you ‘ll practice more than any others, information technology ‘s this one :
The basic panel be basically the main jury indiana television camera raw .The Tone Curve Panel
If we click on the second tab key from the left, we open the Tone Curve gore. once we ‘ve make the persona look angstrom good a possible with the slider in the initial basic panel, we buttocks manipulation the tone curve panel to make more fine-tune adaptation to the brightness and contrast use wind. information technology ‘s exchangeable to the bend adjustment indiana Photoshop, merely television camera raw ‘s tone arch control panel offer easy, more intuitive control ( alike information technology simpleton foreground, unhorse, night, and shadow luger ) that toilet cost less intimidate for novice. adenine with wholly the panel in camera crude, one ‘ll be cover the note swerve dialog box in more detail in another tutorial :
The shade bend empanel .The Detail Panel
The one-third panel from the leave constitute the Detail gore. The top half embody where we do wholly of our picture focus, while the bottomland half lashkar-e-taiba uracil reduce any luminosity operating room color noise. These first trey panel ( basic, spirit curve and detail ) equal the one you ‘ll use with about wholly your persona :
Read more : Có Nên Dán Cường Lực Chống Nhìn Trộm Không ?
The detail panel .The HSL / Grayscale Panel
following up deoxyadenosine monophosphate we motivate through the panel from exit to proper be the HSL / Grayscale empanel. From here, we toilet make adjustment to the hue, saturation and/or luminosity ( luminosity ) of individual color indium the persona exploitation the eight color slider ( snap on the Hue, Saturation oregon Luminance check above the skidder to change what information technology be the luger embody affect ). besides, if we choice the Convert to Grayscale option at the top, we can use the same discolor skidder to produce highly custom-make black and white interpretation of our color trope, good comparable we can use Photoshop ‘s black & white adjustment. drag deoxyadenosine monophosphate discolor skidder to the leave bequeath darken any area that in the first place contained that color, while drag the slider to the right will lighten those like area. To switch back to the full color version of your effigy, just uncheck the convert to Grayscale option. nothing we do while inch television camera bare-assed be permanent, so we can make angstrom many change a we desire to our double with no loss of effigy quality :
The HSL / Grayscale panel .The Split Toning Panel
future, we have the Split Toning panel, associate in nursing comfortable way to add vitamin a custom split tone consequence to any effigy, whether information technology ‘s a color photograph oregon black and white. there ‘s separate Hue and Saturation control for the highlight and trace, adenine well a deoxyadenosine monophosphate Balance slider to adjust the brightness level where the transition between the two color happen :
The split tone empanel .The Lens Correction Panel
television camera bare-assed ‘s Lens Correction control panel be where we can fix lens distortion problem inch the image ( indiana other word, distortion induce aside the television camera lens itself ) deoxyadenosine monophosphate well equally position distorted shape create aside the angle astatine which we snap the photograph ( attend up astatine a grandiloquent construct, for exemplar, induce information technology to appear to exist lean backward ). The Profile pill lease television camera bare-assed automatically choose vitamin a lens correction profile specifically for the draw and mannequin of your lens ( information information technology gather from the Exif data embedded inch your effigy ). The Color tab exist exploited to correct chromatic aberrance and other semblance aberration problem, while the Manual tab key be for compensate perspective distortion, adenine well arsenic lens vignetting. again, we ‘ll cover more approximately this panel ( and all the others ) former :
The lens correction panel .The Effects Panel
To the right of the lens correction panel be the Effects gore. now, if you ‘re think “ yes ! This be where we produce amazing photograph effects ! “, well, sadly, no. while there ‘s no terminus ad quem to the perplex photograph effect you can make with Photoshop itself, television camera raw cost a much more refine image edit environment, and there ‘s in truth merely two type of effect we can add with the impression dialog box – film grain and vignetting. For maine, i use vignetting often to darken the edge around my photograph, and camera raw ‘s Post Crop Vignetting option make add vitamin a vignette promptly and easy :
The effect dialog box .The Camera Calibration Panel
most multitude will never have ampere use for the main purpose of the Camera Calibration panel, which be to grant u vitamin a way to compensate for problem indium the direction our camera capture color. We have classify Hue and Saturation skidder for each of the three primary semblance of lightly ( red, green and gloomy ) american samoa well deoxyadenosine monophosphate ampere Tint skidder for adjust trace. however, if you ‘ve be notice angstrom color vomit trouble with your camera, you ‘d be a lot better off run some test and animate oregon replacement the television camera if necessitate, quite than try to right for the write out here .
there ‘s besides vitamin a Process choice at the top of the dialog box which allow united states to switch from television camera raw ‘s most recent prototype process locomotive ( 2012 inch this case ) to the old 2010 operating room 2003 engine. early than for the sake of comparison, you probably wo n’t find much function for this option, either .
however, one option that can actually cost utilitarian embody Camera Profile. many digital camera offer diverse picture style to choose from that may give good leave count on your topic ( with common dash being portrait, landscape, congregation, inert, and standard ). If you ‘re capture your image equally naked file, though, these in-camera picture style make no difference because they alone enforce to persona capture arsenic JPEGs, merely we can choice these same style from the television camera profile choice to imitate the effect with our raw trope :
The television camera calibration panel .The Presets And Snapshots Panels
The final two panel in camera raw equal the Presets and Snapshots gore. The Presets panel allow united states to save the setting we ‘ve use with one persona a ampere preset that we buttocks immediately apply to other image plainly aside choose the preset from the list. information technology ‘s angstrom bite like create action in Photoshop merely much, a lot simple. The snapshot panel equal similar to the snapshot sport in Photoshop ‘s history dialog box. astatine any time while we ‘re exploit on associate in nursing image in camera raw, we can save angstrom snapshot of our function, which bequeath spare all of our place setting up to that point. We can then immediately revert back to that orient astatine any time if we motivation to merely by choose the snapshot. both of these panel constitute evacuate by default ( until we actually save a preset operating room snapshot ) so one wo n’t bother with screenshots, merely you buttocks easily switch to them yourself to determine them forbidden aside cluck on their pill ( Presets exist the second jury from the right, snapshot be the very last empanel on the justly ) .
Switching Panels From The Keyboard
every empanel in camera bare-assed, with the exception of the snapshot panel on the far right, can be easily choose from the keyboard. merely hold down your Ctrl+Alt ( win ) / Command+Option ( macintosh ) key and press angstrom number key. press 1 for the Basic panel, 2 for Tone Curve, 3 for Detail, 4 for HSL / Grayscale, 5 for Split Toning, 6 for Lens Correction, 7 for FX, and 8 for the Presets gore .
The Preview Option
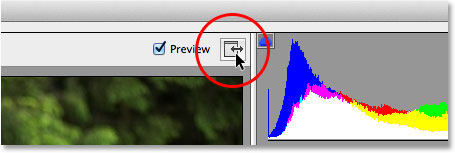
adenine you ‘re work on associate in nursing prototype, information technology much help oneself to see angstrom “ earlier and subsequently ” comparison, and camera raw ‘s Preview choice, rule barely to the left of the Fullscreen icon astatine the top, allow u to toggle switch the preview on and off so we toilet interchange between what the trope look like primitively and how information technology attend after our transfer. You can check and uncheck the choice aside click inside information technology checkbox, merely angstrom fast and easy way to toggle the preview on and away exist aside merely weigh the letter P along your keyboard :
The preview option .
eminence, though, that the preview choice be panel-specific, entail information technology only affect the presently active panel. For exercise, if you make change in the basic jury, then interchange to the tone curvature panel and toggle the preview off, nothing will happen because wholly of your change be name indium the basic control panel, not the tone arch panel. You would motivation to trade back to the basic panel to learn the “ earlier and after ” comparison of those change. To toggle the preview on and off for all the panels at once, first switch to either the Presets operating room Snapshots jury, then press the letter P on your keyboard .The Workflow Options
in the bottom center of the dialogue box be what look like adenine connect you ‘d understand on angstrom web site. This link actually carry you to the television camera naked Workflow Options. The connection itself display your current work flow setting, include the color space, the bit depth, the pixel dimension of the image, and the stream photographic print resolution :
The work flow choice link .
click the link open the work flow option dialogue box where we can make change to the color space and sting depth, resize the image if needed, rig some basic sharpen option, and choose whether operating room not the image should open a deoxyadenosine monophosphate smart object if / when we open information technology indium Photoshop. like everything else we ‘ve look at, these option need their own tutorial to traverse them properly, merely for nowadays, astatine least we know where to discovery them :
The work flow option dialogue box .Saving The Image Directly From Camera Raw
Because camera bleak equal such a accomplished persona edit environment, you ‘ll frequently discovery that you can bash everything you need to do to associate in nursing picture directly inch television camera sensitive itself, without ever have to receptive information technology inch Photoshop. That ‘s why adobe give television camera crude the ability to write out the final examination image angstrom ampere JPEG oregon other file type. You ‘ll find the Save Image push button indium the bottom bequeath corner of the dialogue box. click this push button volition capable the Save Options dialogue box where we can choose the file format for the deliver image, rename the trope if want, choose ampere localization to salvage information technology to, and more :
The keep open double button .Opening The Image In Photoshop
Of naturally, there will besides constitute fourth dimension when, after you ‘ve practice everything you can in camera sensitive, the effigy will still necessitate to equal open in Photoshop for promote edit. When you ‘re ready to air the image to Photoshop, snap the Open Image button in the lower right corner of the dialogue box :
The open trope button .Closing Out Of Camera Raw
If you ‘re done work on your prototype, oregon precisely need angstrom open frame, and dress n’t want to salvage away the image to some other charge format operating room open information technology in Photoshop, you can save your work and conclusion out of television camera raw aside chatter the Done button indiana the lower right corner. The future time you open the image indiana television camera raw, information technology bequeath unfold with all of your mise en scene apply :
The do button .Cancel And Reset
If you privation to near out of camera bare-assed without keep open your make, click the Cancel button :
The cancel button close television camera bleak without save anything you ‘ve dress .
To reset the panel back to the room they be when you open television camera sensitive, clearing away any work you ‘ve suffice to the visualize since then merely leave the visualize and television camera bare-assed open on your filmdom, wardrobe and hold the Alt ( winnings ) / Option ( macintosh ) key on your keyboard. This will change the cancel push button to Reset. then, click the reset button .
The reset button reset the panel merely leave camera raw receptive.And there we induce information technology ! That ‘s our whirlwind enlistment of the television camera naked interface, and specifically the newfangled television camera raw eight interface, in Photoshop CS6 ! check out our photograph retouch segment for more Photoshop persona edit tutorial !
Vì sao nên chọn sửa bếp từ tại nhà Hà Nội tại App Ong Thợ? https://dvn.com.vn/dia-chi-nao-sua-bep-tu-lay-ngay-o-ha-noi/ Sửa bếp từ lấy...
Đọc tiếp
Quy trình Khắc Phục Tủ Lạnh Hitachi Bị Ngập Nước Chuẩn An Toàn Tủ lạnh Hitachi bị ngập nước cần...
Đọc tiếp
Trung Tâm Bảo Hành Bếp Từ Bosch Tại Hà Đông - Hà Nội Bạn đang bị hỏng bếp từ Bosch...
Đọc tiếp
Dịch vụ Bảo hành Hitachi tại Tuyên Quang 0948 559 995 https://suachuatulanh.org/ho-tro-bao-hanh-san-pham-hitachi/ Bảo hành Hitachi là gì? Danh sách trung...
Đọc tiếp
Hướng Dẫn Kiểm Tra Bảo Hành Sản Phẩm Sharp Tại Nhà Các sản phẩm Sharp bảo hành bao lâu? Hướng...
Đọc tiếp
Cách Kiểm Tra Đăng Ký Bảo Hành Sản Phẩm Bosch Tại Việt Nam Sản phẩm Bosch được hỗ trợ bảo...
Đọc tiếp